[

🎉

G2 Spring 2024 Report] Hatica does it again! Wins Momentum Leader, Best Est. ROI and Users Love Us badge among many!Read More ->

Tools2023-03-29

Integrating GitHub Webhooks to a Jenkins Pipeline

Learn to automate Jenkins with GitHub Webhooks. Streamline development, get faster feedback, and enhance collaboration between your teams.
Integrating GitHub Webhooks to a Jenkins Pipeline

Jenkins is a widely used open-source automation server that helps to automate the building, testing, and deployment of software applications. One of the most important features of Jenkins is its ability to integrate with other tools and services. In this article, we will focus on setting up the Jenkins GitHub webhook integration.

Before we dive into the details, let's first understand what a webhook is. A webhook is a way for an application to send real-time information to another application. In the context of Jenkins and GitHub, a webhook is a mechanism by which GitHub notifies Jenkins of changes to a repository. Jenkins can then automatically build and test the code in response to the webhook notification. The webhook is used to trigger a build in Jenkins whenever a new commit is pushed to a GitHub repository.

Importance of Jenkins Github Webhook Integration

The Jenkins GitHub webhook integration is important for several reasons:

  1. Streamlined Development Workflow: With the integration of Jenkins and GitHub, developers can push their code changes to GitHub and have Jenkins automatically build and test their code. This streamlined workflow saves time and reduces the risk of errors, as developers do not have to manually trigger builds or tests.
  2. Faster Feedback Loops: By automating the build and test process with Jenkins, developers receive feedback on their changes faster. This allows them to iterate on their code more quickly and identify and fix bugs sooner, resulting in a more stable and reliable codebase.
  3. Continuous Integration: Jenkins GitHub webhook integration enables continuous integration, which is the practice of frequently merging code changes into a shared repository and automatically building and testing the code. This helps to catch errors and conflicts early in the development process and ensures that the codebase is always in a releasable state.
  4. Enhanced Collaboration: With Jenkins and GitHub integration, teams can collaborate more effectively. Developers can see the build and test results for each commit, making it easier to identify issues and work collaboratively to resolve them. Additionally, developers can receive notifications of build and test failures, allowing them to quickly address any issues that arise.
  5. Overall, the Jenkins GitHub webhook integration helps to improve the development process, reduce errors, and enhance collaboration among team members.

Setting up Jenkins GitHub Webhook Integration

The process involves the following steps:

  1. Installing Jenkins
  2. Installing and configuring the GitHub plugin in Jenkins
  3. Creating a Jenkins job to build the GitHub project
  4. Creating a webhook in GitHub
  5. Testing the webhook

Let's discuss each step in detail.

Step 1: Installing Jenkins

The first step in setting up Jenkins GitHub Webhook Integration is to download and install Jenkins. Jenkins can be installed on various operating systems, including Windows, macOS, and Linux. The installation process varies depending on the operating system you are using. You can refer to the Jenkins documentation for detailed instructions on how to install Jenkins on your operating system.

Once Jenkins is installed, you can access it using a web browser by navigating to http://localhost:8080 (assuming that you installed Jenkins on the same machine where you are running the browser).

Step 2: Installing and configuring the GitHub plugin in Jenkins

Jenkins comes with a wide range of plugins that can be used to extend its functionality. The GitHub plugin is one such plugin that allows Jenkins to interact with GitHub.

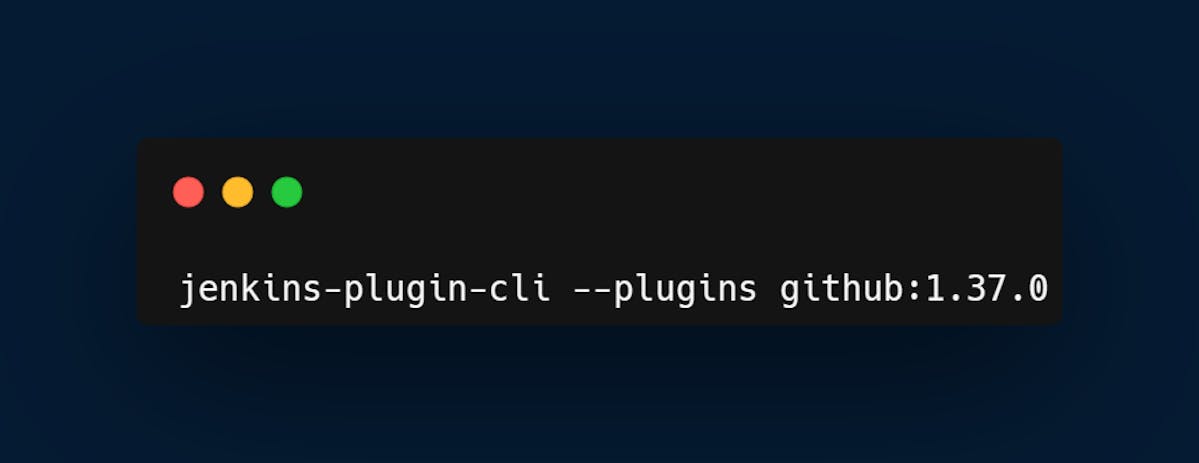
To install the GitHub plugin, navigate to the Jenkins dashboard, click on Manage Jenkins, and then click on Manage Plugins. In the Available tab, search for "GitHub plugin" and install it. Or run the CLI command below, or instead, you can choose to run a direct download, and run one of the releases.

Jenkins plugins

The plugin integrates Jenkins with Github projects and currently has three major functionalities:

  • Create hyperlinks between your Jenkins projects and GitHub
  • Trigger a job when you push to the repository.
  • Report build status results back to GitHub as commit status.

Once the plugin is installed, you need to configure it. To do this, navigate to Manage Jenkins > Configure System, and scroll down to the GitHub section. Here, you need to provide your GitHub account credentials and configure the GitHub server API URL.

Step 3: Creating a Jenkins job to build the GitHub project

Now that the GitHub plugin is installed and configured, you need to create a Jenkins job to build the GitHub project.

To create a new Jenkins job, click on New Item on the Jenkins dashboard. Give the job a name, and select Freestyle project as the job type. In the Source Code Management section, select Git as the SCM, and provide the GitHub repository URL.

In the Build Triggers section, select "GitHub hook trigger for GITScm polling". This will enable Jenkins to trigger a build whenever a new commit is pushed to the GitHub repository.

In the Build section, add the build steps that you want Jenkins to execute when it triggers a build. For example, you can use a build step to compile the code, run unit tests, and package the application.

Once you have configured the Jenkins job, save the changes.

Step 4: Creating a webhook in GitHub and Configuration

The next step is to create a webhook in GitHub. A webhook is a URL that GitHub will call whenever a new commit is pushed to the repository. This URL will trigger a build in Jenkins.

Jenkins can set up configurations for you manually or automatically. Let’s look at how to set up configurations manually. To create a webhook manually, navigate to your GitHub repository, click on Settings, and then click on Webhooks. Click on Add webhook, and provide the Jenkins URL. The Jenkins URL should be in the following format:

http://<jenkins_server>/github-webhook/

Replace <jenkins_server> with the hostname or IP address of your Jenkins server. Under "Which events would you like to trigger this webhook?", select "Just the push event".

Once you have configured the webhook, click on Add webhook to save. Using the automatic mode, Jenkins will automatically add/remove hook URLs to GitHub based on the project configuration in the background. You'll specify a GitHub OAuth token so that Jenkins can log in as you to do this.

  1. Go to the global configuration and add GitHub Server Config.
  2. Create your personal access token in GitHub.
  3. Plugin can help you to do it with all the required scopes. Go to Advanced -> Manage Additional GitHub Actions -> Convert Login and Password to a token.
GitHub API Authentication

4. Select previously created "Secret Text" credentials with a GitHub OAuth token.  Required scopes for the token to be able to manage hooks your token should have admin:org_hook scope.

Step 5: Test the webhook

To test the webhook, make a change to the GitHub repository and push the changes to the repository. This will trigger the webhook and Jenkins should automatically start the job. To verify that the job was triggered, go to the Jenkins job and check the build history. You should see a new build triggered by the GitHub webhook. If the build was successful, the changes you pushed to the repository should have been built and tested.

Conclusion

Testing a Jenkins GitHub webhook integration is a critical step in ensuring that your continuous integration and continuous delivery (CI/CD) pipeline is working correctly. By following the steps outlined in this article, you can set up and test a Jenkins GitHub webhook integration to automate the build and testing of your code in response to changes in your GitHub.

To make the most of Jenkins, and GitHub, an engineering analytics tool is the need of the hour. Hatica offers metrics across 13 dashboards, powered by CI/CD tools, Jira, Asana, Jenkins and GitHub. By collating tool activities at one place, Hatica helps teams streamline their workflow, cut through the clutter of unwanted alerts, and improve productivity.

TL;DR

Subscribe to Hatica's blog

Get bi-weekly insights straight to your inbox

Share this article:
Table of Contents
  • Importance of Jenkins Github Webhook Integration
  • Setting up Jenkins GitHub Webhook Integration
  • Step 1: Installing Jenkins
  • Step 2: Installing and configuring the GitHub plugin in Jenkins
  • Step 3: Creating a Jenkins job to build the GitHub project
  • Step 4: Creating a webhook in GitHub and Configuration
  • Step 5: Test the webhook
  • Conclusion
  • TL;DR

Ready to dive in? Start your free trial today

Overview dashboard from Hatica